WEM Certificates
Types of WEM Certificates
Currently, all WEM APIs, except for the Prudential and Settlement Service (PaSS) APIs, have transitioned to the APIM platform.
Users require different certificates to access APIs, depending on whether the API in question is hosted in the APIM or not.
Accessing APIs on our APIM platform (i.e. most of them) requires a DigiCert Certificate.
Accessing our Prudential and Settlement Service (PaSS) APIs requires a Local Certificate.
For support, contact AEMO WA Energy Market Management:
Email: wa.operations@aemo.com.au
Local Certificates
If a Local Certificate is required to access the PaSS APIs, please ask your Market Participant Administrator (MPA) to request a Local Certificate from WA Energy Market Management: wa.operations@aemo.com.au for each user. Provide details of the Participant, the User and the Environment (Preprod/Prod).
AEMO will return the Certificate and password separately. The Certificate will go to the MPA, and the password will go to the User.
DigiCert Certificates
Requesting a DigiCert certificate
To access AEMO APIs using the API Management platform (APIM), you will need a DigiCert certificate issued by AEMO.
The steps for obtaining a DigiCert certificate are listed in the table below with further detail on generating a CSR found later in this section:
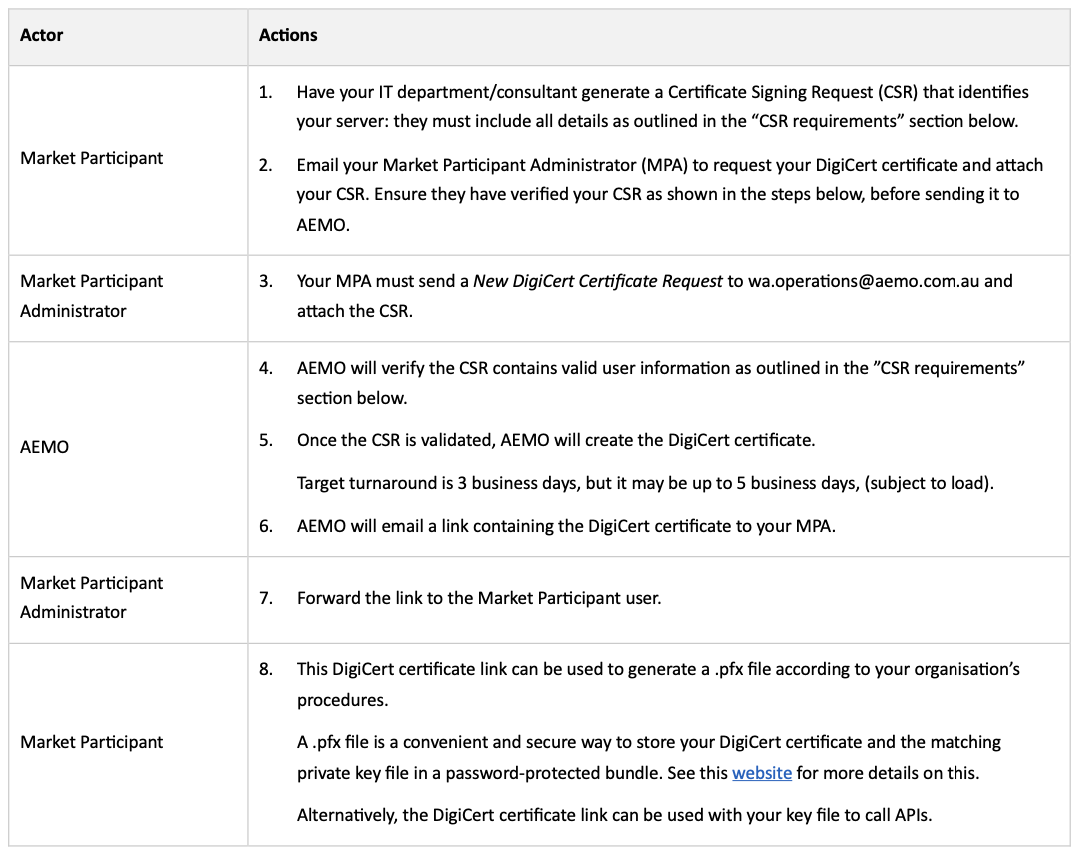
See this website for more details on using a .pfx file.
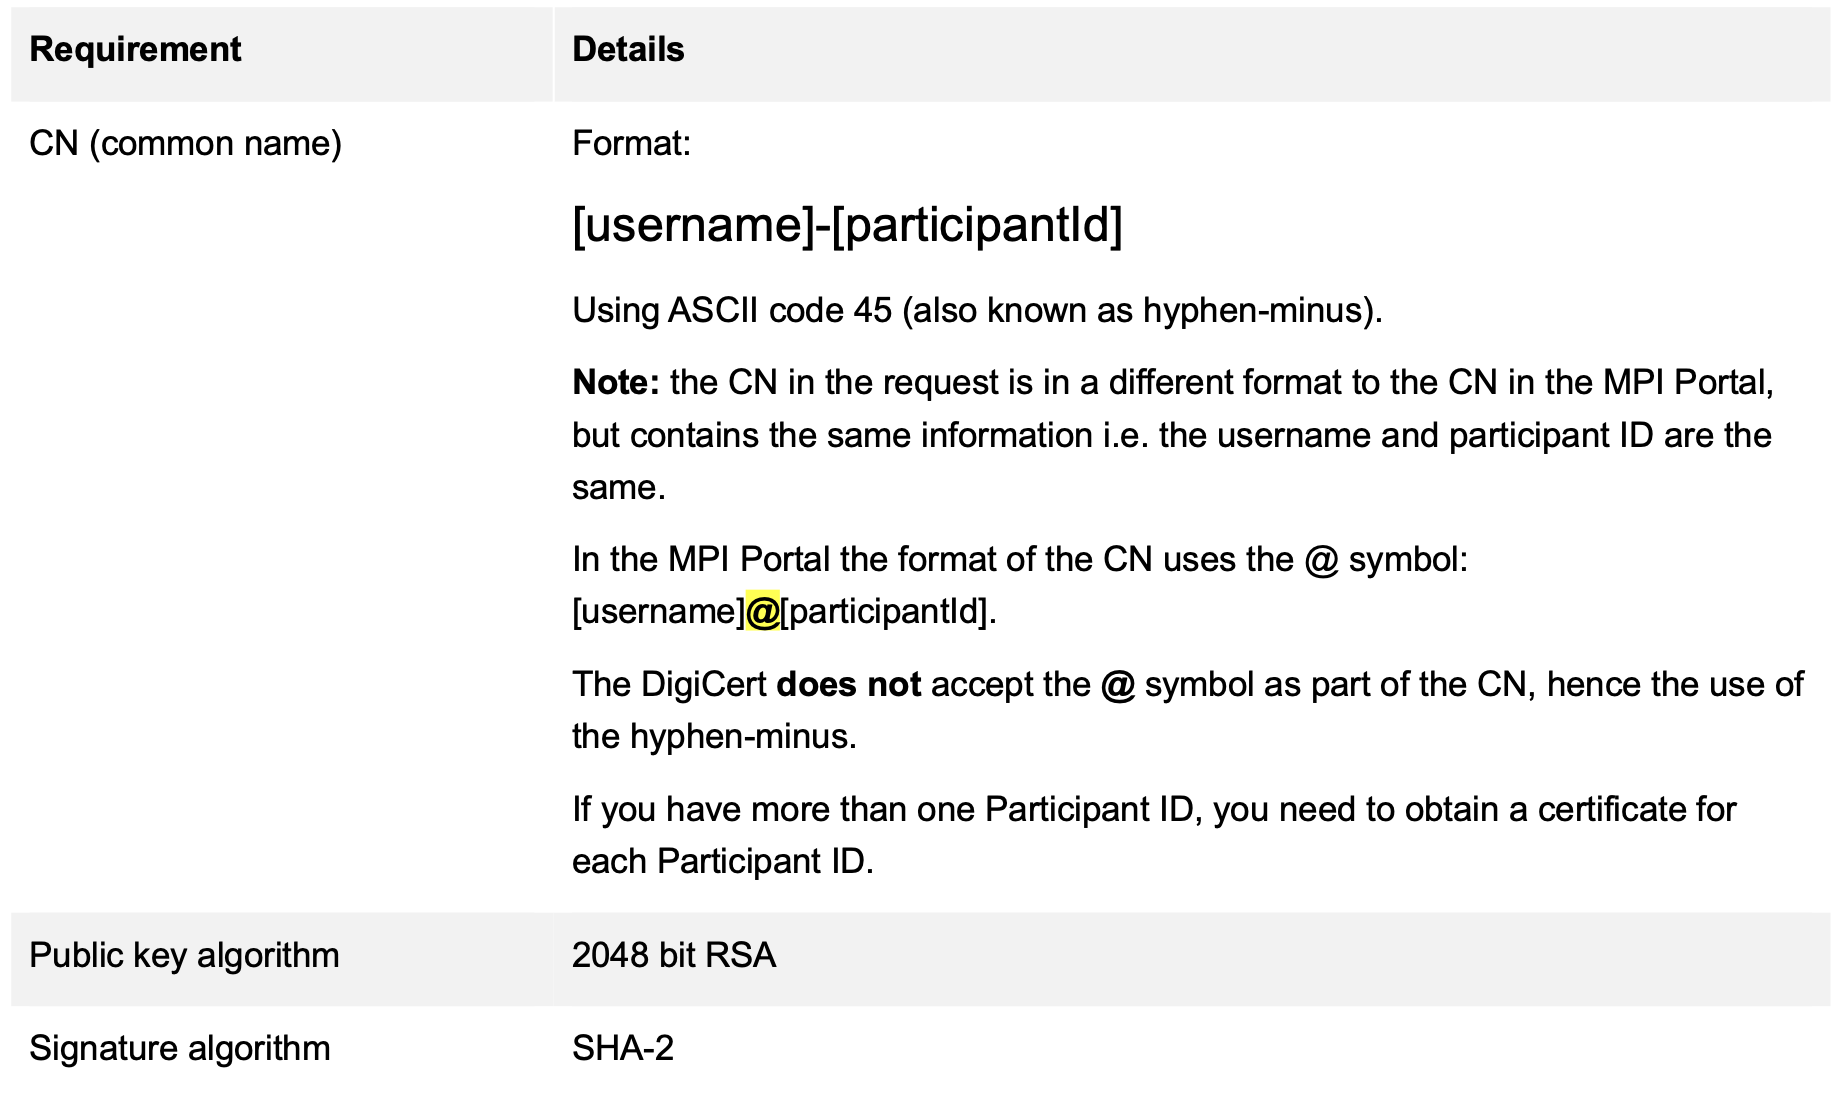
CSR requirements
Before you begin, ensure that you do not set the Challenge password.
The CSR file sent to AEMO must meet the following:
Creating a CSR file
The first step in obtaining a DigiCert certificate is to create a certificate signing request (CSR) that can be sent to AEMO.
The CSR contains the common name(s) you want your certificate to secure, information about your company, and your public key. In order for a CSR to be created, it needs to have a private key from which the public key is extracted.
You will need to know your Participant ID to identify the organisation to AEMO.
Note:
The challenge password must NOT be set.
The CN is the key to authentication – make sure that it is in the correct format as outlined in the “CSR requirements” section.
DigiCert certificates are valid for three years.
Instructions for generating the CSR depend on your server and operating system. Review the following guides to assist you with creating a CSR:
Instructions on the DigiCert website on how to create a CSR for different platforms and operating systems
DigiCert also provides a utility for Windows to create a CSR: take a look here.
Step-by-step example of creating a CSR file using OpenSSL on Windows
To assist you in creating a CSR file, we have outlined the steps below. In this example we are working in Git.exe which uses OpenSSL on Windows.
OpenSSL is like a special toolbox for computer security. It provides tools and protocols that help keep information safe when it's sent over the internet. Think of it as a lock and key system for digital communication. It's widely used to make sure that websites, emails, and other online services are secure and private. Programmers and companies rely on OpenSSL to protect sensitive data and make sure it doesn't fall into the wrong hands.
Using Windows:
Git Bash comes included as part of the Git For Windows package. Download and install Git For Windows the same way you do for other Windows applications. Once downloaded find the included .exe file and open to execute Git Bash.
Linux or macOS:
For other platforms you can download Git Bash and read more about the program here. This webpage includes instructions for installing Git on different platforms.
This website also includes useful information to learn about Git.
Step 1: Create a folder
Create a folder where you will store your certificate: you can use the format [username]-[participantId]. In this example the username is ‘aemotester’ and participant ID is ‘imowa’:

Step 2: Open Git Bash
Right click anywhere in the folder window and select “Git Bash Here”:
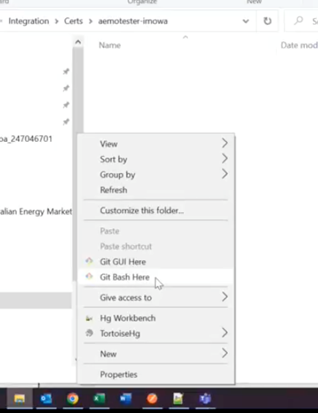
A screen similar to this will open:
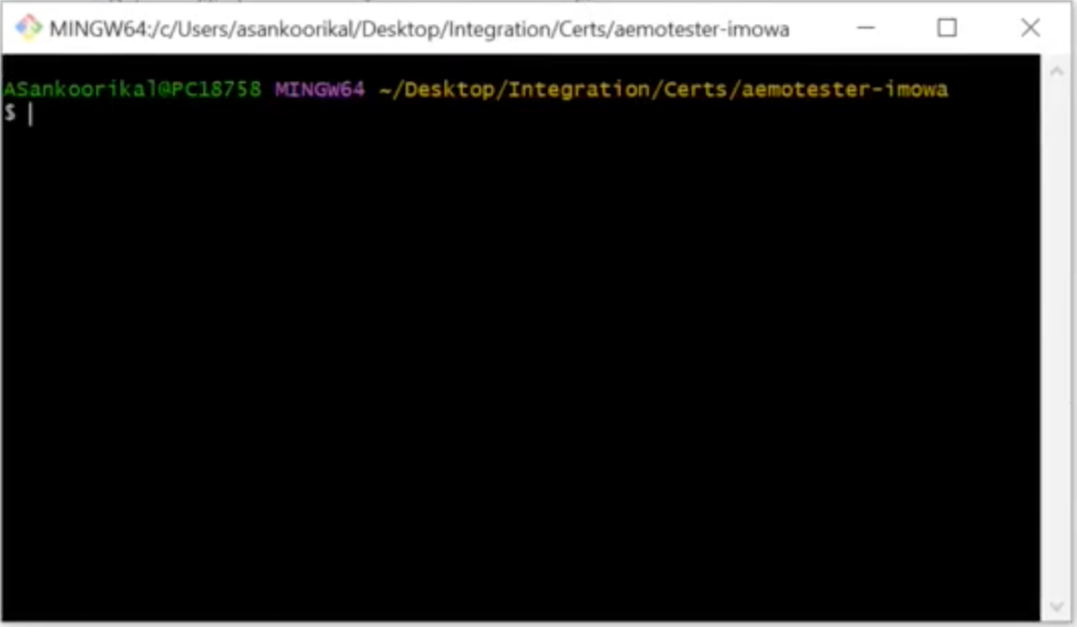
Step 3: Generate your Private Key
Paste the following command next to the $ in this window to generate your private key:

This command generates a private key in the folder you created:
The private key will be named: [username]-[participantId].key
- Generated from this part of the code that you enter: -out [username]-[participantId].key
Using the RSA algorithm
- Generated from this part of the code that you enter: genrsa
With a key length of 2048 bits
- Generated from this part of the code that you enter: 2048
You will see the private key in the folder as shown below:
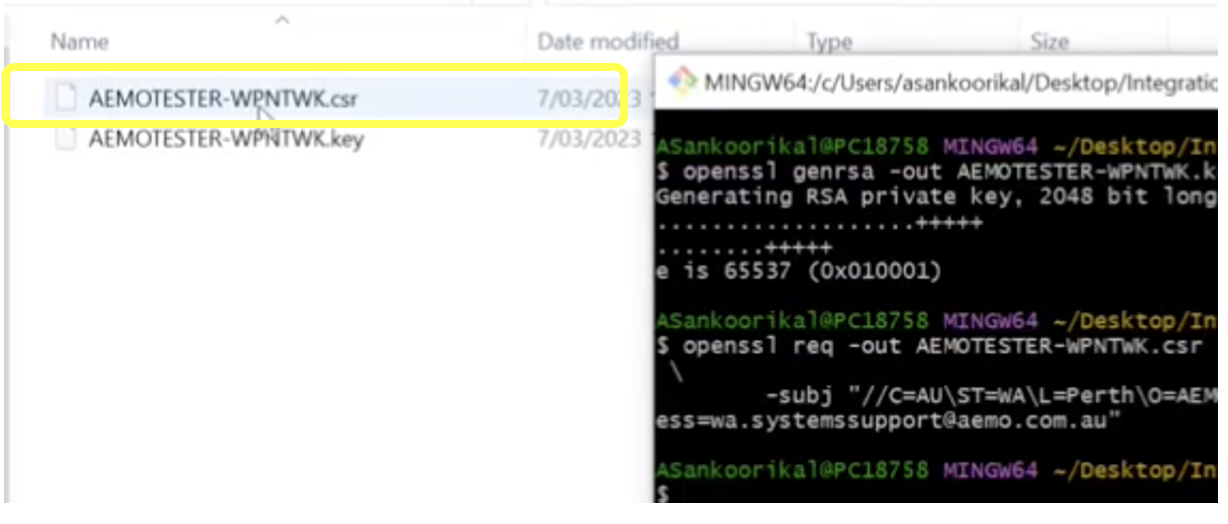
This key file is the most secure part of your certificate, and this should never be shared with anyone, including AEMO.
Step 4: Create your CSR
After generating your private key, you are ready to create your CSR. The CSR contains the public key (extracted from the private key) as well as information about your company.
Customise the highlighted text within the following command using your company details to create a CSR:

To understand what to include within the code, review the explanations in the table below:
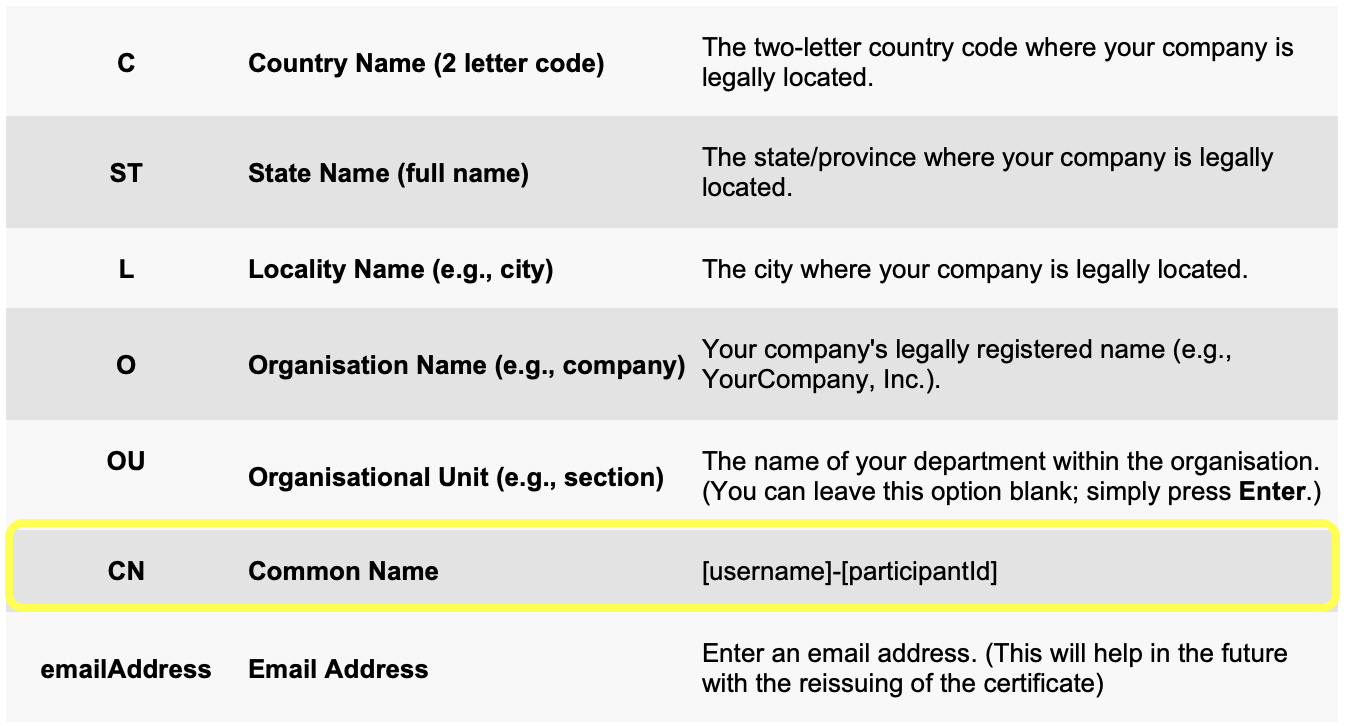
Besides the Common Name, the rest of the customisable parts of the above code are not important and will not affect the validity of the CSR.
After entering your customised code, if you are asked if you want to set a challenge password, simply press enter – do not set a challenge password.
Here is the example of the code entered for the username ‘aemotester’ and participant ID is ‘imowa’:
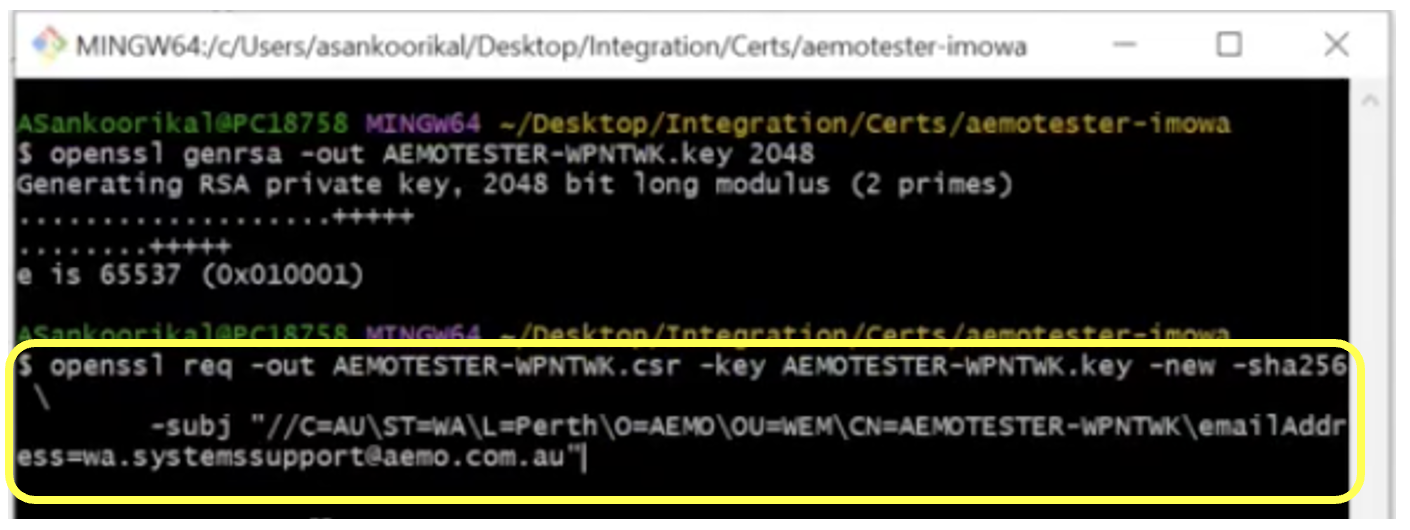
You will now have two files:
[username]-[participantId].key: This is your private key. Keep this secret and secure.
[username]-[participantId].csr: This is the CSR that you'll submit to AEMO to get a DigiCert certificate.

Step 5: Verify your CSR file
There are numerous websites that allow you to verify your CSR file. Check with your organisation for the correct procedure to complete this step.
Step 6: Send your verified CSR file to AEMO
When you send this CSR request to AEMO, AEMO will create your public key and send it back to you. The public key along with your private key is what you use to connect to the APIs.